

How To Repair Graphics Cards
Introduction
Graphics cards "fire out" and are not usable later 5-10 years of operation. Every bit these "burn outs" occur, some graphics cards can exist recovered temporarily using these steps.
While following this guide, exist extremely careful- this procedure tin can potentially damage your GPU beyond repair. Applying heat to a video carte du jour for a continuous amount of time will melt the solder connections and potentially repair any damaged solder points.
Warning: Be cautious of toxic gas that is created when heating up plastic, solder, and electrical components. Always wear protective clothing and gloves when handling heated materials. Ensure you properly ventilate the expanse you lot are working in and do non breathe in toxic fumes.
-
-
Check to see if your warranty is valid. This tin can be done by looking upwardly the serial number of your graphics card for retail cards in most situations. For OEM video cards, the warranty is tied to the system and may expire sooner so a retail card.
-
-
-
If the graphics carte is still installed into the system, begin by removing the menu.
-
Unplug all applicable cables from the graphics card as highlighted in blueish, your card may have more than or less cables
-
-
-
To remove your bill of fare you'll need to remove the screw(s) from the back of the card
-
After doing so ensure that there is no other things blocking the card from being removed from the motherboard
-
Remove the card from the PC
-
-
-
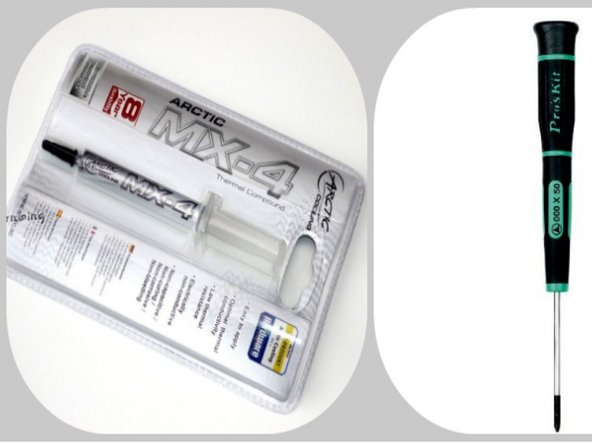
Precision screwdriver(southward): commonly Phillips #0 and/or #1.
-
Aluminum foil to cover estrus sensitive components while propping the card up onto the tray.
-
Thermal paste to supervene upon the paste afterwards.
-
Paper towels to rub any excess of old heatsink chemical compound from the components. (Alcohol wipes work equally-well)
-
An oven.
-
A baking tray.
-
-
-
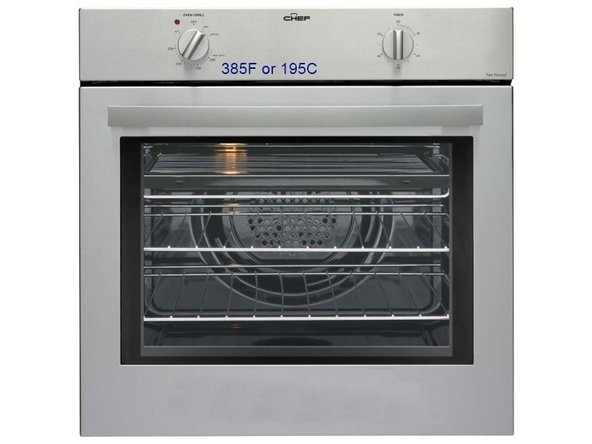
Preheat the oven to 385F (195C).
-
Well-nigh of these temporary repairs only consist of the expanding/shrinking of bumps under the surface mount of the graphics chip. Therefore, a lower heat may work as well.
-
-
-
While the oven is pre-heating:
-
Remove the screws or clips holding your fan and any duct-work to the video carte.
-
Gently take the fan/duct-work off.
-
Remove whatever old heatsink compound from the chips (using a paper towel).
-
-
-
Fix the timer on your oven for 5 -10 minutes.
-
-
-
Place the GPU on a baking sheet with the side with virtually of the chips facing up.
-
Place the baking canvass or dish in the centre of the oven.
-
-
-
Vent the oven five - x times by opening the door. This will regulate temperature.
-
-
-
You have 2 options:
-
i. Test the card quickly without reinstalling the fan/heatsink.
-
2. Reinstall the fan/heatsink, so test the carte du jour.
-
Echo steps 2-9 if GPU fails test.
-
Go on to pace ten if GPU passes test.
-
-
-
Apply thermal paste onto the primary fleck or on the connectedness side of the fan.
-
Place the heat-sink over the GPU advisedly, lining up whatsoever screws or clips.
-
Apply heatsink on thermal pads equally applicative.
-
-
-
Clean off any noticeable dust on the GPU.
-
-
-
Reinsert GPU into GPU slot on motherboard.
-
Monitor GPU temperatures while PC is at idle, opening programs, while performing intensive tasks.
-
-
-
Verify that the fan was reconnected (if in that location is 1).
-
Verify that the fan spins when the PC is powered upward.
-
Verify the GPU works and is detectable by the system.
-


Embed this guide
Choose a size and copy the code below to embed this guide every bit a minor widget on your site / forum.
Preview

Source: https://www.ifixit.com/Guide/Temporarily+Repair+a+Lost+Cause+Graphics+Card+by+Heating+it+up+in+an+oven/2240
Posted by: larsonexampations.blogspot.com
0 Response to "How To Repair Graphics Cards"
Post a Comment